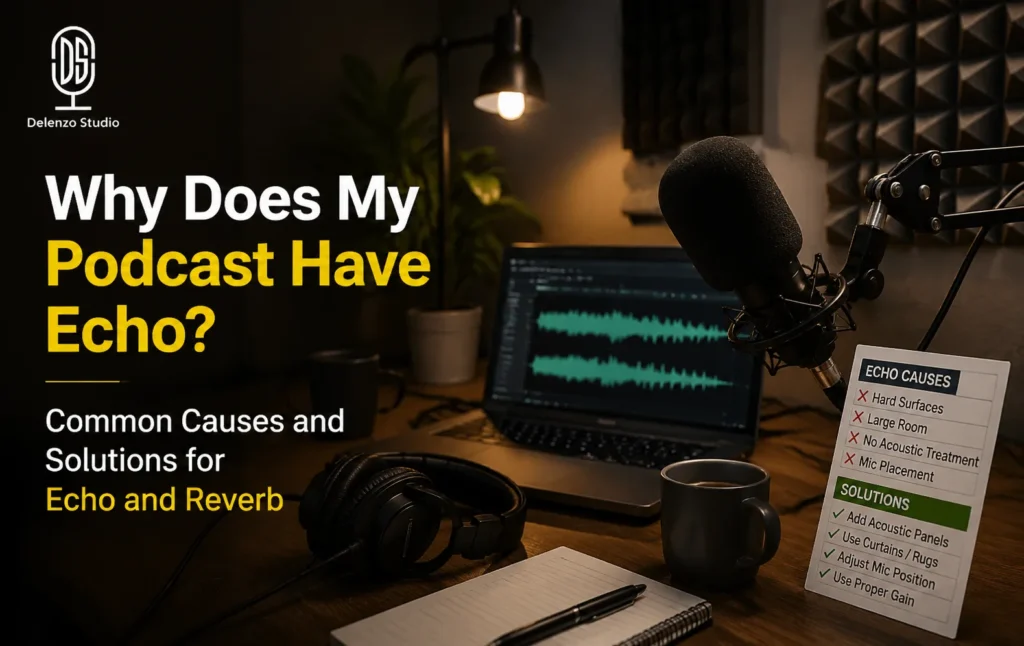
Your podcast has an echo and you want to know why. You recorded a solid episode. The topic was good, the conversation flowed, and you felt confident about the take. Then you played it back and heard your own voice bouncing around like you recorded inside an empty bathroom.
Echo is one of the most common problems new and intermediate podcasters deal with in home setups. The frustrating part is that it has nothing to do with how well you speak or how good your content is. It is almost always a room problem, a positioning problem, or a settings problem all of which are fixable.
This guide covers exactly why podcasts have echo and what you can do about it, starting today. Some fixes cost nothing. Some take five minutes. You will know what is causing your specific problem before you finish reading.
Echo vs Reverb vs Feedback — What You’re Actually Hearing
Echo, reverb, and feedback are not the same problem. Most podcasters use these terms interchangeably, but each has a different cause and a different fix. Identifying which one you are dealing with saves you from applying the wrong fix.
- Echo — A distinct repetition of your voice. You hear yourself twice, with a clear gap between the original sound and the reflected copy.
- Reverb — Not a repeat. It is a blurry decay of sound caused by reflections bouncing off hard surfaces in a small space. Your voice sounds washed out, like you recorded inside a bathroom.
- Feedback — That sharp, painful squeal you hear when microphone output loops back into itself through a speaker or monitoring system. It is the loudest and most instantly identifiable of the three.
The Clap Test — Diagnose Your Room in 3 Seconds
The clap test is the fastest way to diagnose room echo before spending money on any treatment or equipment. Stand in the middle of your recording space, clap once sharply, and listen to what happens immediately after.
| What You Hear | What It Means | What To Do |
| Clean, immediate stop | Room is acoustically fine | Check mic technique or software settings |
| Short, soft decay | Mild reverb present | Move closer to the mic, add soft furnishings |
| Clear ringing tone | Flutter echo from parallel walls | Basic acoustic treatment for podcast recording required |
| Long, lush reverb tail | Too much hard surface area | Treat the room significantly or change rooms |
This one clap tells you more than any plugin will. If the room rings, no amount of post-production will fully fix it. Solve it at the source first.
The 6 Most Common Causes of Echo and Reverb in Podcast Recordings
Echo and reverb in podcast recordings almost always trace back to one of six sources. Knowing which one applies to your setup means you fix the right thing on the first attempt.
Cause 1 — Bare Walls, Hard Floors, and Too Many Parallel Reflective Surfaces
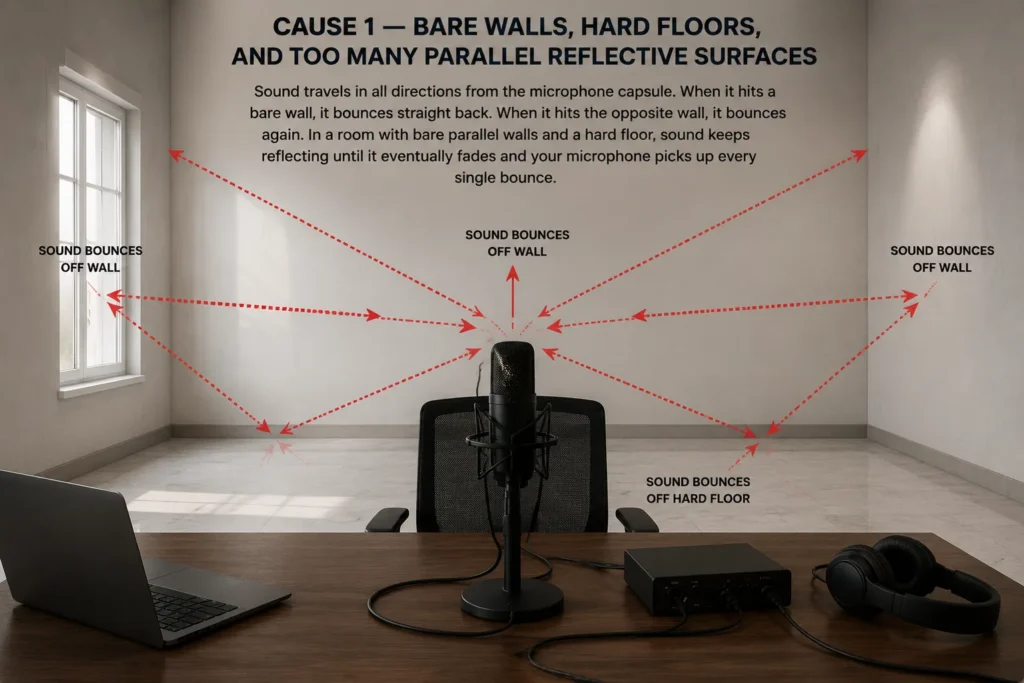
Sound travels in all directions from the microphone capsule. When it hits a bare wall, it bounces straight back. When it hits the opposite wall, it bounces again. In a room with bare parallel walls and a hard floor, sound keeps reflecting until it eventually fades and your microphone picks up every single bounce.
This is the most common podcast reverb cause for home recorders. Concrete, tile, glass, and untreated drywall are all highly reflective. Even a standard bedroom with bare walls and a hard floor will introduce noticeable room sound.
Cause 2 — Recording Too Far From the Microphone
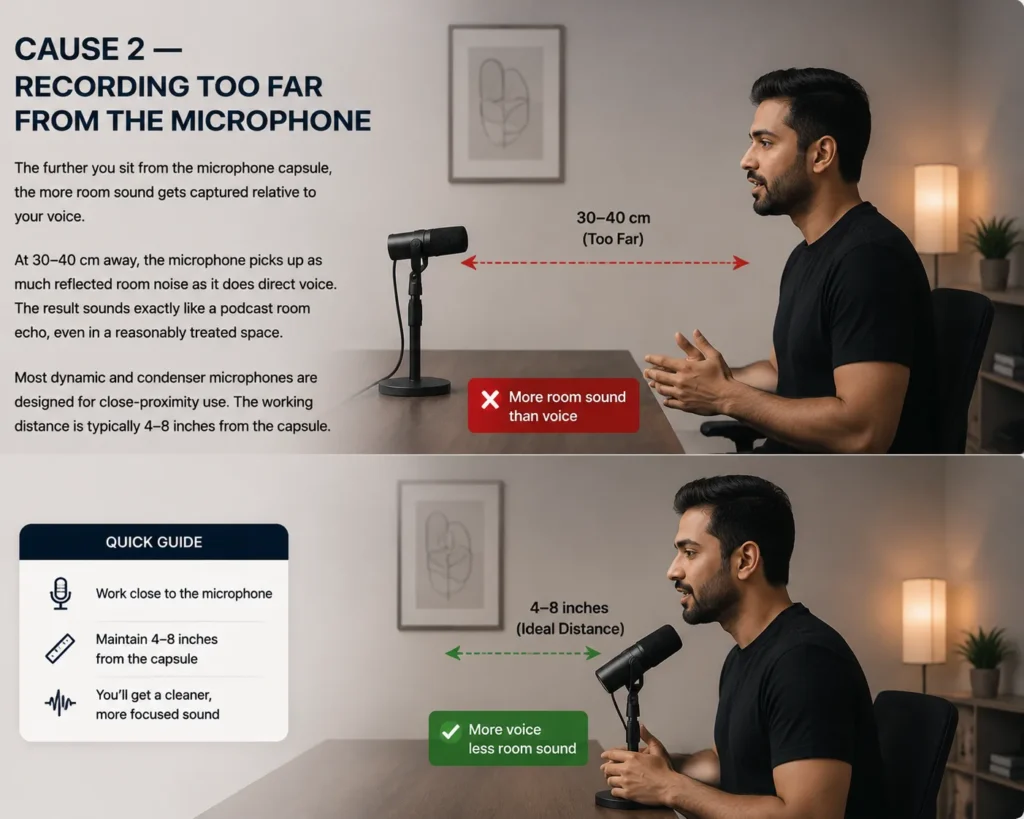
The further you sit from the microphone capsule, the more room sound gets captured relative to your voice. At 30–40 cm away, the microphone picks up as much reflected room noise as it does direct voice. The result sounds exactly like a podcast room echo, even in a reasonably treated space.
Most dynamic and condenser microphones are designed for close-proximity use. The working distance is typically 4–8 inches from the capsule. For more details on choosing the right gear, check out our podcast equipment guide.
Cause 3 — The Microphone Positioned Near a Reflective Surface
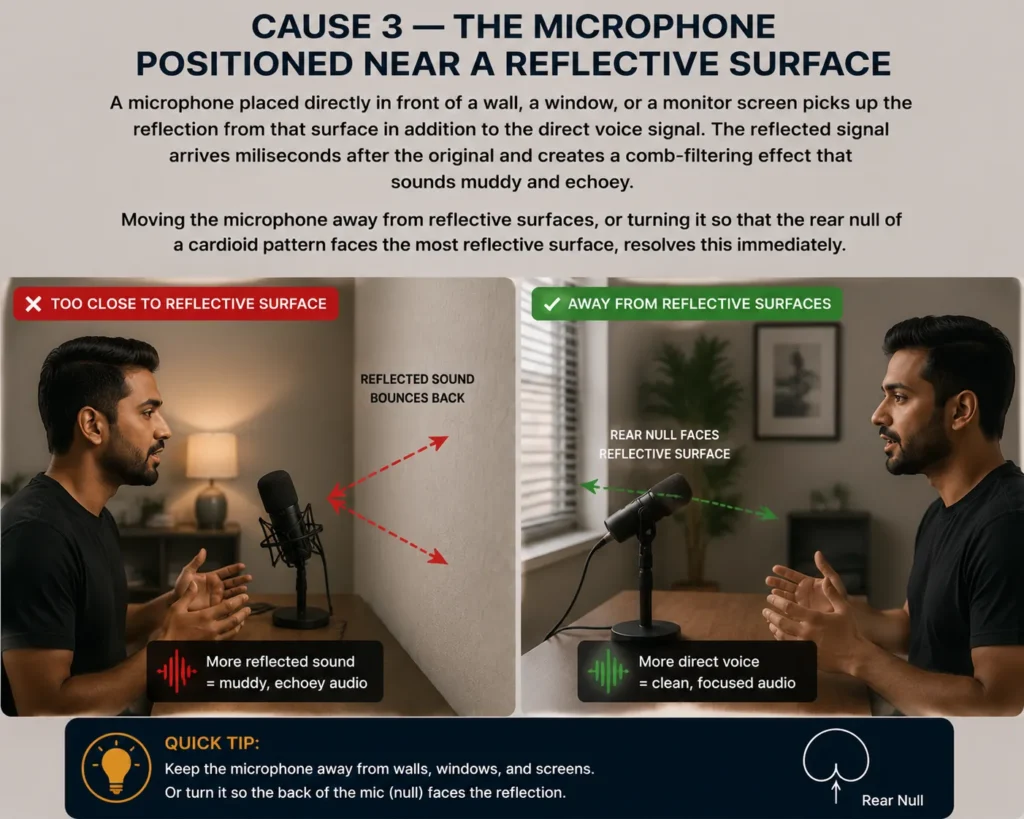
A microphone placed directly in front of a wall, a window, or a monitor screen picks up the reflection from that surface in addition to the direct voice signal. The reflected signal arrives milliseconds after the original and creates a comb-filtering effect that sounds muddy and echoey.
Moving the microphone away from reflective surfaces, or turning it so that the rear null of a cardioid pattern faces the most reflective surface, resolves this immediately.
Cause 4 — Speaker Feedback Causing a Monitoring Loop
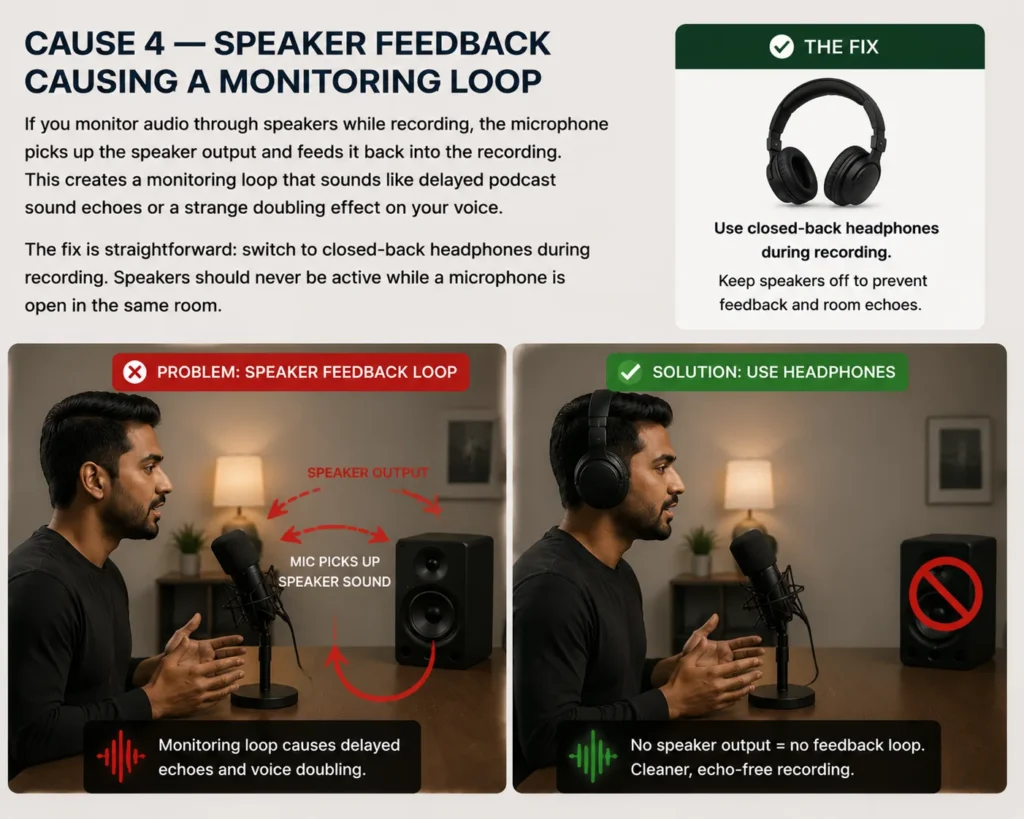
If you monitor audio through speakers while recording, the microphone picks up the speaker output and feeds it back into the recording. This creates a monitoring loop that sounds like delayed podcast sound echoes or a strange doubling effect on your voice.
The fix is straightforward: switch to closed-back headphones during recording. Speakers should never be active while a microphone is open in the same room.
Cause 5 — Phase Cancellation in Multi-Microphone Setups
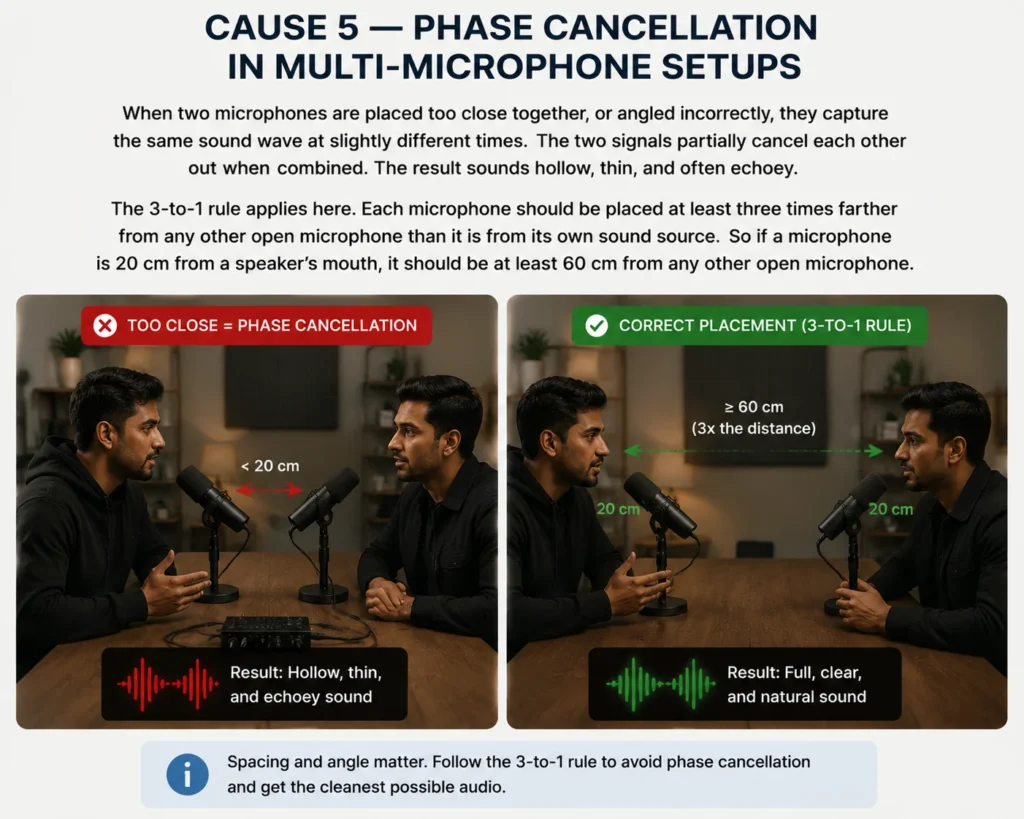
When two microphones are placed too close together, or angled incorrectly, they capture the same sound wave at slightly different times. The two signals partially cancel each other out when combined. The result sounds hollow, thin, and often echoey.
The 3-to-1 rule applies here. Each microphone should be placed at least three times farther from any other open microphone than it is from its own sound source. So if a microphone is 20 cm from a speaker’s mouth, it should be at least 60 cm from any other open microphone.
You can learn more about how audio waves interact from this guide on microphone phase cancellation.
Cause 6 — Software Monitoring Settings Causing Digital Echo
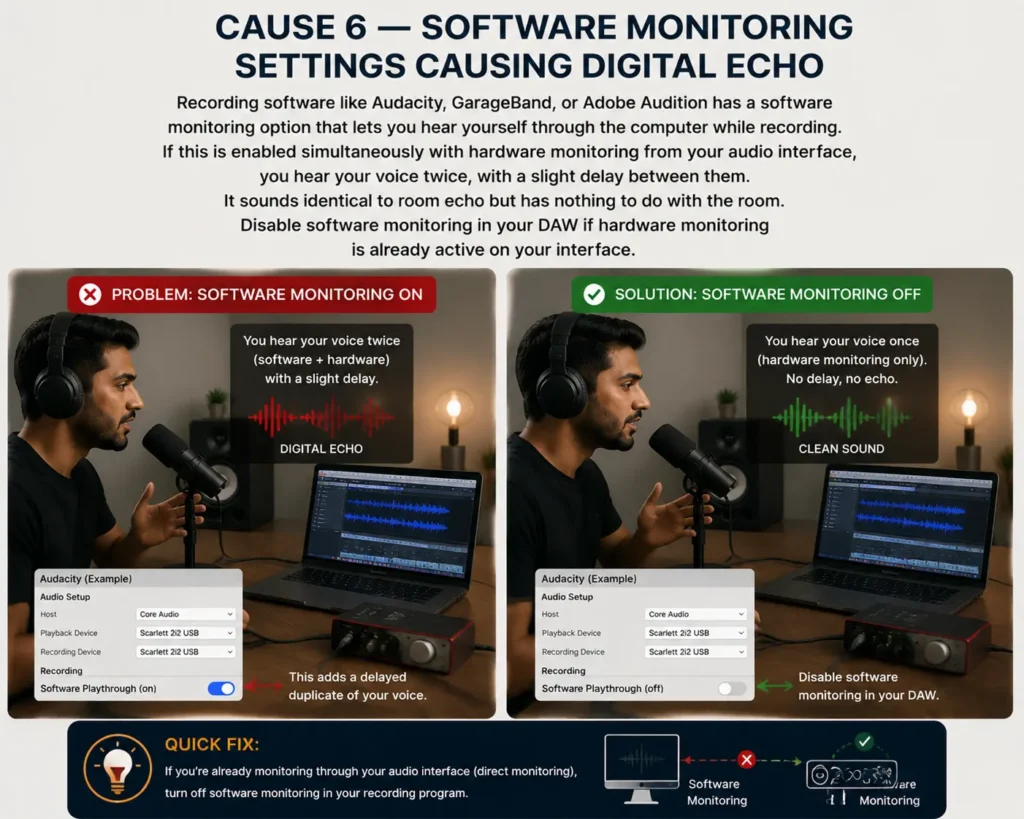
This one catches a lot of beginners. Recording software like Audacity, GarageBand, or Adobe Audition has a software monitoring option that lets you hear yourself through the computer while recording. If this is enabled simultaneously with hardware monitoring from your audio interface, you hear your voice twice, with a slight delay between them.
It sounds identical to room echo but has nothing to do with the room. Disable software monitoring in your DAW if hardware monitoring is already active on your interface.
The Fix Hierarchy — What to Address First
To fix echo in podcast recording, work from the source outward. Start with the room, then microphone position, then physical materials, and only then software. The right fix applied first costs less and delivers more.
- Change the room. Move to a soft-furnished space, a bedroom with curtains, a carpeted room, or a wardrobe. This costs nothing and delivers the biggest single improvement. A furnished bedroom consistently outperforms an empty room with expensive foam panels.
- Move closer to the microphone. Position yourself 4–6 inches from the capsule, slightly off-axis to reduce plosives. This one adjustment cuts room noise significantly and sharpens overall clarity.
- Add soft materials temporarily. Hang blankets on the walls behind and beside you. Lay a rug on a hard floor. Drape clothes around the recording position. Very low cost, noticeable results from the first take.
- Install acoustic foam or broadband absorbers for permanent, consistent results. Proper acoustic treatment for your podcast space works best alongside the earlier steps, not as a replacement for them.
- Use a reflection filter around the microphone. A portable acoustic shield reduces rear and side reflections, especially useful when treating the full room is not practical.
- Apply post-production echo removal last. Software can reduce light reverb but cannot rescue a recording made in a badly reverberant room. Use it to confirm good conditions, not to compensate for poor ones.
Free Solutions — Fixing Echo Without Spending Any Money
You do not need acoustic panels or specialist equipment to reduce podcast echo. The three most effective free solutions use what is already in your home. Each one works immediately and requires no installation.
Record in a Bedroom or Wardrobe
A furnished bedroom outperforms most untreated home recording spaces. Carpet absorbs low-frequency reflections. Curtains and bed linen handle mid and high frequencies. Soft furnishings break up parallel wall reflections naturally. Close the door, pull the curtains, and record. The improvement is immediate.
The Closet Method
A wardrobe full of hanging clothes is one of the most effective improvised recording environments available. Clothes absorb and scatter sound in all directions, eliminating flutter echo almost entirely. Professional audio engineers use this method regularly for voiceover work. Step inside, pull the door mostly shut, and record.
DIY Acoustic Treatment With Household Materials
Pin thick blankets or duvets to the walls on either side of your recording position. Lay a rug on a hard floor. Stack books or cushions behind the microphone to break up rear reflections. None of this is permanent but all of it works. Play back the recording and the difference is clear.
How a Professional Podcast Studio Eliminates Echo Entirely
A professional podcast studio eliminates echo by removing its causes at the room level. Acoustic panels, bass traps, and controlled room geometry ensure sound waves have nowhere to reflect. The microphone captures direct voice only, no reverb tail, no flutter echo, no phase issues.
All home solutions in this guide improve conditions that were never designed for recording. A treated studio removes the problem entirely, not partially.
At Delenzo Studio in Gulberg, Lahore, podcast rooms are professionally soundproofed and acoustically treated. The setup includes RØDE NT1 and Audio Technica AT2020 microphones, RØDE Caster Pro II mixer, Sony A7III and Sigma BF cameras, and Audio Technica M40X headphones. Every session is clean from the first take, no post-production acoustic repair needed.
Book a session via WhatsApp at +92 325 1111082 or visit delenzostudio.com.pk.
Conclusion
Echo in podcast recordings almost always comes from the room, the microphone position, or a settings issue not from the microphone itself. The clap test diagnoses the problem in seconds. Free solutions like recording in a bedroom or wardrobe fix the majority of cases. For consistent, professional results without managing acoustic problems every session, a treated studio removes the issue entirely.
If your podcast has echo and nothing above is working, the room is the answer and a professional studio is the simplest way to solve it.
FAQs
A good microphone cannot fix a bad room. Echo comes from sound bouncing off hard, reflective surfaces before reaching the capsule. Treating the room or moving to a soft-furnished space resolves the problem at its source.
Stand in the centre of your recording space and clap once sharply. A clean stop means the room is fine. A ringing tone or long decay means reflections are present and acoustic treatment or a room change is needed.
Record in a wardrobe full of hanging clothes or a carpeted bedroom with curtains drawn. Hang thick blankets on walls near your recording position. These free solutions reduce echo significantly without any specialist equipment or installation.
Your guest’s untreated room is the source. Online recording platforms capture their room acoustics along with their voice. Ask remote guests to record in a soft-furnished space with closed-back headphones to prevent this.
Software like Adobe Audition can reduce light reverb in a recorded episode. However, heavy echo is difficult to fully remove without damaging vocal quality. Fixing the room before recording always produces cleaner results than post-production repair.