
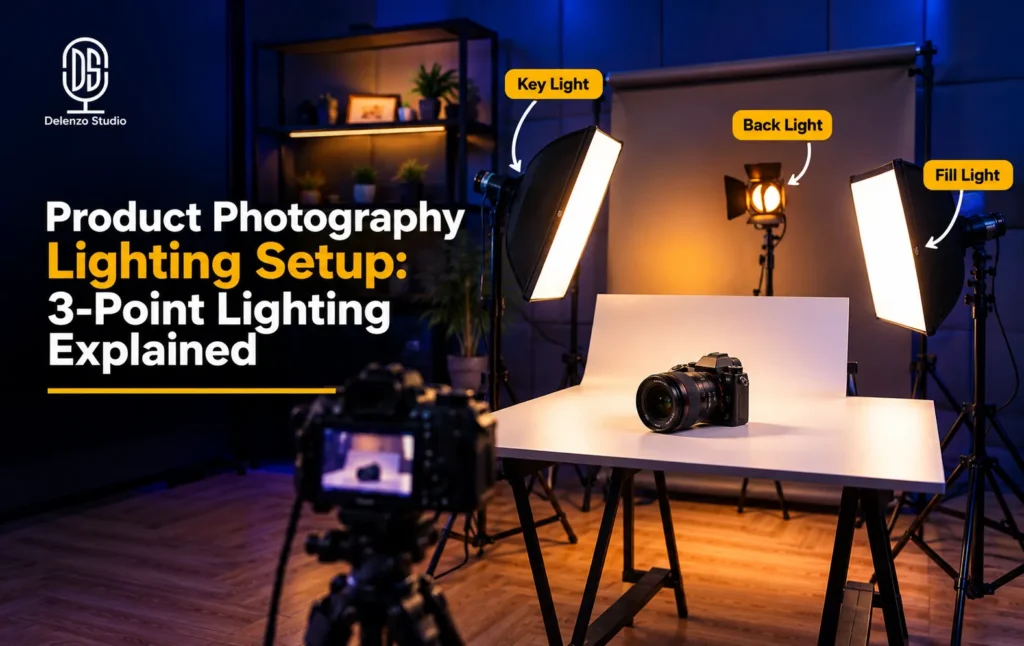
3-point lighting is a setup that uses three lights, called the key, fill, and backlight. They sit around a product to control shadows, separate it from the background, and add depth. It is the foundation most professional product lighting builds on. Most lighting guides explain this technique for portraits or film. This guide covers 3-point lighting for product photography specifically. Products are smaller than people, often reflective, and usually shot on a tabletop. Those differences change your angles, your light ratios, and how much diffusion you need.
Below, you will learn what each light does, where to place it, and which ratio suits your goal. You will also find a two-light budget option, a gear list, and the mistakes that most often ruin product shots.
What Is 3-Point Lighting?
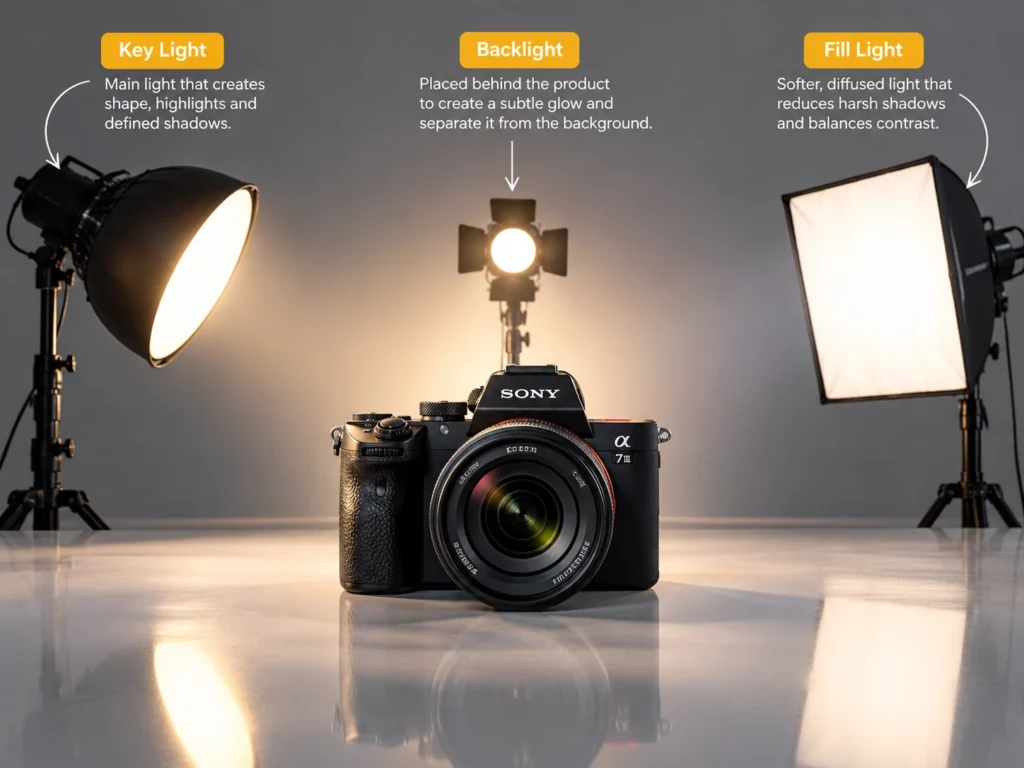
3-point lighting is a lighting method that uses three separate light sources, each with one clear job. One light shapes the product, one softens shadows, and one separates the product from the background.
The method started in film and portrait work. It became a standard because it gives you full control. Instead of depending on window light or room bulbs, you decide where every shadow and highlight falls.
In product photography, that control matters even more. Online buyers cannot pick up the item and turn it in their hands. Your photo has to show its shape, texture, and finish clearly.
A basic 3 point lighting setup gives you three practical benefits:
- Depth: Controlled shadows make a product look three-dimensional instead of flat.
- Control: You can adjust each light on its own without disturbing the others.
- Consistency: The same setup repeats across a full catalog, so every listing looks uniform.
What is the 20-60-20 rule in photography?
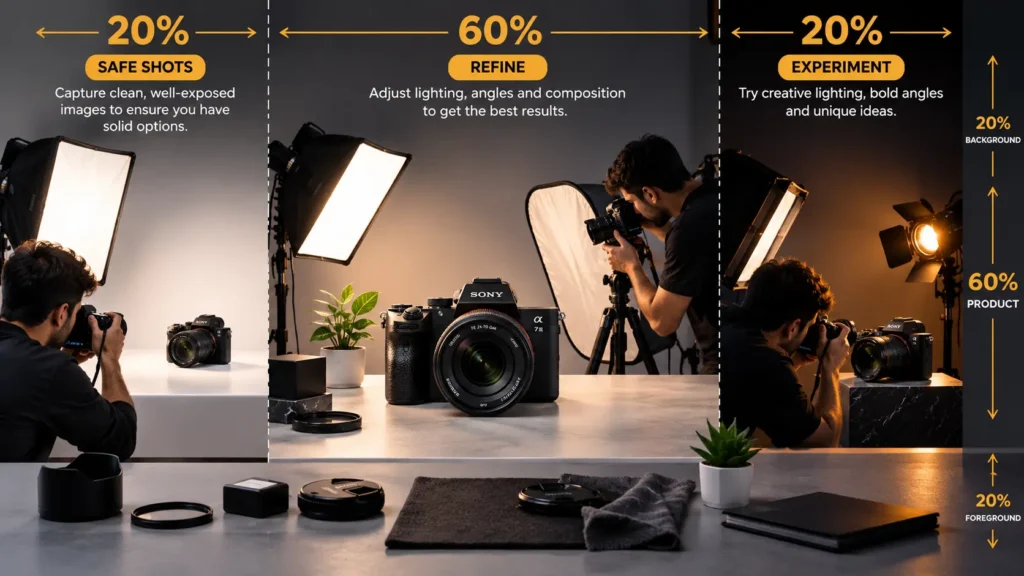
The 20-60-20 rule is a photography guideline that divides a shoot, or a frame, into three parts. It helps you balance reliable results with creative freedom.
The rule is most often credited to wildlife photographer Paul Nicklen as a shooting workflow. Many photographers also use the same numbers as a composition guide. Both versions work well for product shoots.
1. The 20-60-20 shooting workflow
- First 20%: Secure safe shots. Capture clean, correctly exposed images you could publish right away.
- Middle 60%: Refine. Adjust light angles, ratios, and composition to improve every shot.
- Final 20%: Experiment. Try bold ideas, like strong rim light, deep shadows, or unusual angles.
| Version | First 20% | Middle 60% | Last 20% | Product Shoot Use |
|---|---|---|---|---|
| Workflow | Safe, clean shots | Refining light and angles | Creative experiments | Lock a catalog shot first, then test dramatic rim light |
| Composition | Props or foreground | The product itself | Background | Keep the product dominant so nothing competes with it |
2. The 20-60-20 composition rule
- 60%: The product. It carries most of the visual weight and draws the eye first.
- 20%: Foreground or props. Small supporting items add context without competing for attention.
- 20%: Background. A clean backdrop sets the mood and frames the product.
Good lighting supports both versions. A solid three-light base secures your safe shots quickly. It also keeps the product as the brightest, clearest part of the frame.
What Are the Three Lights in a 3-Point Lighting Setup Called?
The three lights are the key light, the fill light, and the backlight. Some photographers call the backlight a rim light or hair light. Together, the key fill backlight arrangement handles shape, shadow, and separation.
| Light | Main Job | Typical Position | Relative Power |
|---|---|---|---|
| Key Light | Shapes the product and sets exposure | 45 degrees to one side, raised above | Strongest |
| Fill Light | Softens shadows from the key | Opposite side of the key | Lower than key |
| Backlight | Separates product from background | Behind and slightly above | Varies by backdrop |
What Does the Key Light Do?
The key light is your primary and strongest light source. It defines the product’s shape, shows surface texture, and creates the main highlights. Most photographers place it at a 45-degree angle from the product.
If you are learning how to set up 3 point lighting for product photos, always start here. Switch on the key light alone and study the result. Every other light only adjusts what the key light has already created.
A softbox works best on the key for most products. It spreads the light and gives smoother highlights on curved or shiny surfaces.
What Does the Fill Light Do?
The fill light sits opposite the key light at a lower intensity. Its job is to soften the shadows the key light creates without removing them completely.
Keeping some shadow is important. Shadows are what tell the eye a product has depth and form. Remove them fully and the item starts to look like a flat cutout.
The fill can be a second light or a simple reflector. Either way, it should never overpower the key.
What Does the Backlight Do?
The backlight sits behind the product. It adds a thin line of light along the edges, which separates the item from the background and creates depth.
This matters a lot in product work. A product that blends into its backdrop looks unprofessional and cheap. The problem is worst with dark items on dark backgrounds or white items on white seamless paper.
What Angle Should the Key Light Be for Product Photography?
The standard starting point is 45 degrees to the side of the camera. For product work, you also need to raise the light above the product and angle it downward.
This is the biggest difference from portrait lighting. In portraits, the key usually sits near head height. Products are smaller and are shot at tabletop level, often from a slightly top-down angle. A light at portrait height would hit the product too flatly from the side.
Follow these steps for a reliable starting position:
- Place the product on your table and set the camera at your shooting angle.
- Move the key light 45 degrees to the left or right of the camera.
- Raise it until it points down at the product from about 30 to 45 degrees above.
- Bring it close enough that the softbox appears large relative to the product.
- Take a test shot and check where the shadow falls.
Adjust from there based on the product shape:
- Flat items like wallets or cards need a higher key, sometimes almost overhead.
- Tall bottles work better with the key closer to eye level and slightly raised.
- Boxes and packaging look best at 45 degrees, showing the front, one side, and the top.
What Is the Ratio Between Key Light and Fill Light?
The lighting ratio compares how bright the key light is against the fill light. A 2:1 ratio means the key is twice as bright as the fill. This number controls how deep your shadows look.
There is no single correct ratio in 3-point lighting for product photography. The right choice depends on the look you want.
- A 2:1 ratio gives a more dimensional, higher-contrast result. It suits premium products, tech gear, and lifestyle shots.
- A 1.5:1 ratio gives a flatter, evenly lit look. It suits clean e-commerce listings on marketplaces and online stores.
At Delenzo Studio, we use a 1.5:1 ratio for most Daraz and Amazon listing shoots. It keeps white-background images bright and consistent.
| Ratio | Difference in Stops | Look | Best For |
|---|---|---|---|
| 1:1 | 0 | Completely flat, no shaping | Rarely ideal for products |
| 1.5:1 | About half a stop | Soft and even, catalog clean | Marketplace and web store listings |
| 2:1 | 1 stop | Dimensional with gentle contrast | Premium products and brand shots |
| 4:1 | 2 stops | Dramatic, deep shadows | Ad campaigns and moody hero images |
To set a ratio without a light meter, start with both lights at the same distance and modifier. Then lower the fill power until you reach the look you want. Halving the fill power gives you roughly a 2:1 ratio.
Distance also changes brightness quickly. Moving a light twice as far away cuts its brightness to about a quarter. Small moves of the fill light are often easier than changing power settings.
Where Do You Place the Backlight for Product Photos?
Place the backlight behind the product and slightly above it. Aim it toward the top or edge of the item to create a thin rim of light. That rim separates the product from the backdrop.
A good product photography backlight setup follows a simple order:
- Position the light behind the product, out of the camera’s view.
- Raise it slightly above the product’s top edge.
- Angle it so light skims the edges rather than hitting the lens directly.
- Start at low power and increase it until a clean edge appears.
- Check for lens flare and block stray light with a flag or card if needed.
Plain seamless backgrounds make this light especially useful. Without it, product edges often melt into the paper, especially in tone-on-tone shots.
Glass and liquid products respond well to backlighting too. Light passing through a bottle makes the liquid glow and shows its true color.
Use a grid or snoot on the backlight when possible. These accessories narrow the beam, so light stays on the product edges instead of spilling onto the background.
Can You Do 3-Point Lighting With Only Two Lights?
Yes. A reflector can replace the fill light by bouncing the key light back onto the shadow side of the product. This is one of the most common budget setups for small product photography.
It works well because the products are small. A reflector close to the item catches plenty of light from the key. You then use your second light as the backlight.
| Reflector type | Effect | Best for |
| White | Soft, natural fill | Most everyday products |
| Silver | Brighter, crisper fill | Dark or matte products |
| Gold | Warm fill | Food, wood, and cosmetics |
| White foam board | Soft fill at very low cost | Beginners and home setups |
Control the fill strength by moving the reflector. Closer gives brighter shadows. Farther away gives deeper shadows and more contrast.
For more low-cost ideas, read our guide on taking quality product photos without expensive gear.
What Equipment Do You Need for 3-Point Lighting Product Photography?
You need three light sources, stands to hold them, and a clean backdrop. A reflector is optional but useful as a fill substitute.
| Item | Why you need it | Practical tip |
| 3 light sources | Key, fill, and backlight | Continuous LEDs are easiest for beginners to see and adjust |
| Softboxes | Diffuse light and reduce glare | Choose a larger softbox for the key |
| Light stands | Hold lights at exact heights | A boom arm helps with overhead angles |
| Reflector | Optional fill substitute | White foam board works as a cheap start |
| Seamless backdrop | Clean, distraction-free background | White suits e-commerce; colored paper suits brand shots |
| Tripod | Keeps framing consistent across shots | Essential when shooting a full catalog |
| Grid or snoot | Controls backlight spill | Useful for dark or glossy products |
Buying and learning all this gear takes time and budget. For one-off shoots or large catalogs, a ready-equipped studio often works out simpler.
At Delenzo Studio in Lahore, our video studio is already set up with professional lighting and backdrops. You can also leave the lighting to our team through our product photography services.
Common Mistakes When Setting Up 3-Point Lighting for Products
Even with good gear, a few common errors can make product photos look flat or cheap. Here is what to watch for, and how to fix each one.
- Equal key and fill power (1:1 ratio). This produces a flat, dimensionless look that hides product detail. Lower the fill until soft shadows return.
- No diffusion on reflective products. Bare lights create harsh hotspots and glare on glass, metal, and gloss. Use softboxes or diffusion panels on every light.
- Skipping the backlight. The product blends into the backdrop instead of standing out. Even a small, low-power rim light solves this.
- Using portrait height and angles. Lights set at head height miss the top of a tabletop product. Raise the key and angle it downward.
- One fixed setup for every product. Flat items, tall bottles, and odd packaging all need different placements. Adjust height and angle for each product shape.
A quick habit helps avoid all five. Take a test shot after adding each light, rather than switching all three on at once.
Conclusion: Using 3-Point Lighting for Better Product Photos
The key, fill, and backlight structure works for products just as it does for portraits and film. The difference lies in the details. Angles move higher, ratios depend on your sales goal, and reflective surfaces need more diffusion.
Start with the key light at 45 degrees, raised above the product. Add a fill or reflector to soften shadows. Finish with a backlight to separate the product from the background. Then adjust for each product’s shape.
Mastering 3-point lighting for product photography takes some practice, but the results show quickly. Cleaner shadows and sharper edges make products look more premium and trustworthy.
If you would rather skip the gear and setup, Delenzo Studio can help. Book our video studio in Lahore to use a ready lighting setup, or explore our professional product photography services for finished, listing-ready images.
Ready for Your Next Photoshoot?
Book Delenzo Studio for professional portraits, product photography, fashion shoots, and creative photo sessions in Lahore.
Explore Our Photo StudioFrequently Asked Questions
3-point lighting uses a key light, fill light, and backlight around a product. Together, they shape the item, soften shadows, and separate it from the background for depth.
What is the ideal light ratio for product photography?
A 2:1 key-to-fill ratio suits most product photography, giving soft shadows and natural depth. Choose 1.5:1 for bright, even e-commerce listings, or 4:1 for dramatic, moody advertising shots.
Yes. Use a reflector in place of the fill light to bounce the key light onto the product’s shadow side. Your second light then works as the backlight.
Diffuse every light with softboxes or diffusion panels to spread the light evenly. Then shift the light angle until hotspots fade, and use black cards to shape reflections.
Flat photos usually come from equal key and fill power or a missing backlight. Lower the fill to bring back soft shadows, and add a backlight for edge separation.