Great portraits don’t happen by accident. Behind every striking image is a photographer who understands how light works, where to place it, how to shape it, and how to use it to reveal the best in every face. Portrait photography lighting is the single most powerful tool in a photographer’s kit. It doesn’t matter whether you’re shooting in a big commercial studio or a small home setup if you get the light right, everything else falls into place.
This guide breaks down 7 professional portrait photography lighting setups that photographers actually use every day. You’ll learn what each one does, when to use it, and how to recreate it whether you’re just starting out or looking to sharpen your skills. We’ve also included real tips on equipment, common mistakes to avoid, and how to adapt your approach for different skin tones. Whether you’re preparing for your first studio session or you already have some experience and want to level up, this is the resource you’ve been looking for. Let’s get into it.
What is Portrait Photography Lighting and Why Does It Matter?
Simply put, portrait photography lighting refers to how photographers use artificial or natural light sources to illuminate a subject’s face and body in a controlled, intentional way. But it goes much deeper than just pointing a light at someone. Good lighting can make skin look luminous, eyes look alive, and facial features appear sculpted. Bad lighting does the opposite: it flattens faces, creates unflattering shadows, and makes even the most beautiful subject look ordinary.
Think about how different a person looks under harsh midday sun versus soft golden-hour light. The same principle applies in a studio. The direction, quality, and intensity of your light all shape how the final image feels. Professional photographers don’t leave light to chance. They learn the setups, understand the tools, and then make intentional decisions every single time they pick up a camera. That’s the foundation of consistent, high-quality portrait work.
What are the most common portrait lighting setups used by professionals?
There are quite a few portrait lighting techniques out there, but most working photographers build their entire practice around a handful of core setups. Each one has a distinct look and a different use case. Here are the seven setups you need to know.
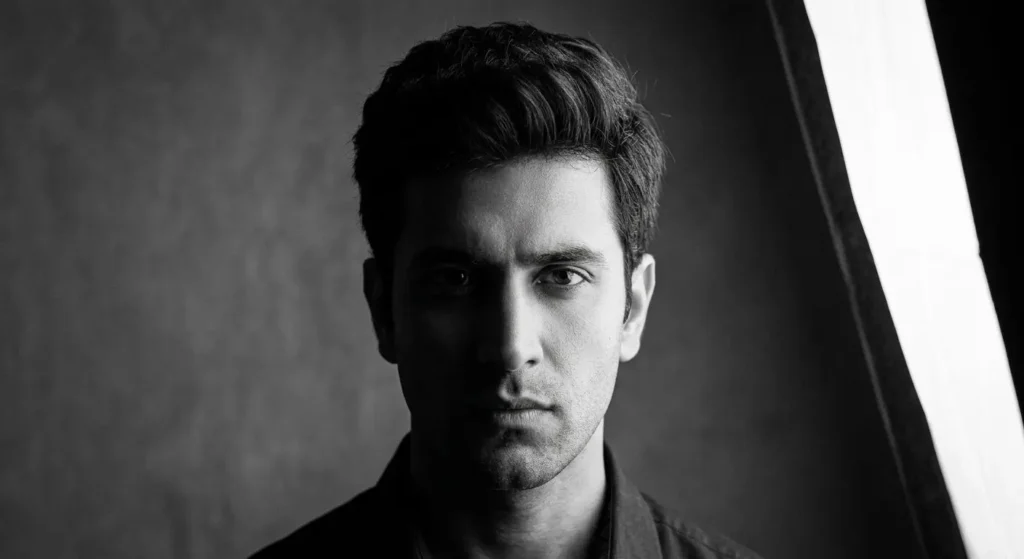
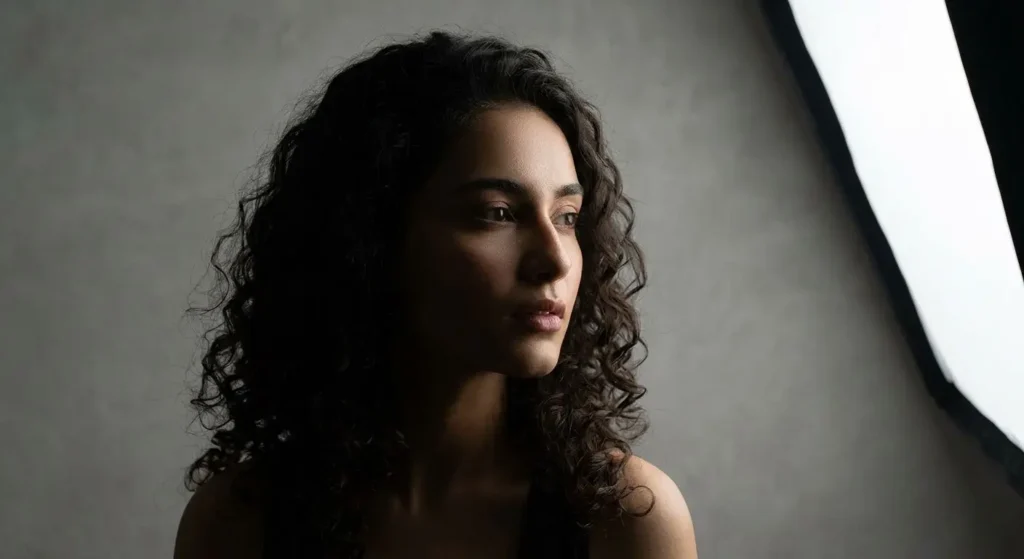
Rembrandt Lighting
Rembrandt lighting is named after the Dutch painter who famously used this dramatic style in his portraits. You’ll recognise it immediately by the small triangle of light that appears on the shadowed cheek of the subject.
To achieve it, place your key light at roughly a 45-degree angle above and to the side of your subject’s face. The nose shadow drops down and just touches the cheek shadow to form that signature triangle. It’s moody, artistic, and undeniably powerful.
This setup works beautifully for character portraits, creative headshots, and editorial work where you want a strong sense of depth and drama. It can be tricky for beginners because the light placement needs to be precise too far and the triangle disappears, too close and the shadows merge. A single key light and a reflector on the opposite side are all you need to get started. Many professional photographers consider this the gold standard for expressive portrait photography lighting work.
Butterfly Lighting
Butterfly lighting also called Paramount lighting is a favourite in beauty and fashion photography for one simple reason: it’s incredibly flattering. Place your key light directly in front of your subject and slightly above them, angled downward toward the face. This creates a small butterfly-shaped shadow under the nose. The even, front-facing light minimises blemishes, smooths skin texture, and makes eyes appear bright and wide.
It’s a beginner-friendly setup because there’s not much that can go wrong. The light source goes in front, above, and that’s largely it. A reflector placed below the chin bounces light back up and softens any under-chin shadows. This is the setup to reach for when your client wants to look polished, glamorous, and camera-ready. It’s widely used in magazine-style headshots, beauty campaigns, and professional brand photography.
Split Lighting
Split lighting is exactly what it sounds like the light literally splits the face in half. One side is fully lit, the other is in deep shadow. The key light goes directly to the side of your subject at a 90-degree angle. This setup creates a bold, high-contrast look that’s popular in editorial photography, musician portraits, and any scenario where you want the image to feel strong and edgy. It’s less conventional than butterfly or loop lighting, which makes it stand out.
Because half the face is in shadow, it can create a slimming effect, something some subjects appreciate. However, it’s not always the most flattering choice for all face shapes, so it helps to test the angle before committing. Split lighting works especially well in black-and-white photography. The dramatic tonal contrast it creates translates beautifully to monochrome, and it gives images a timeless, artistic quality that stands apart from everyday portraits.
Loop Lighting
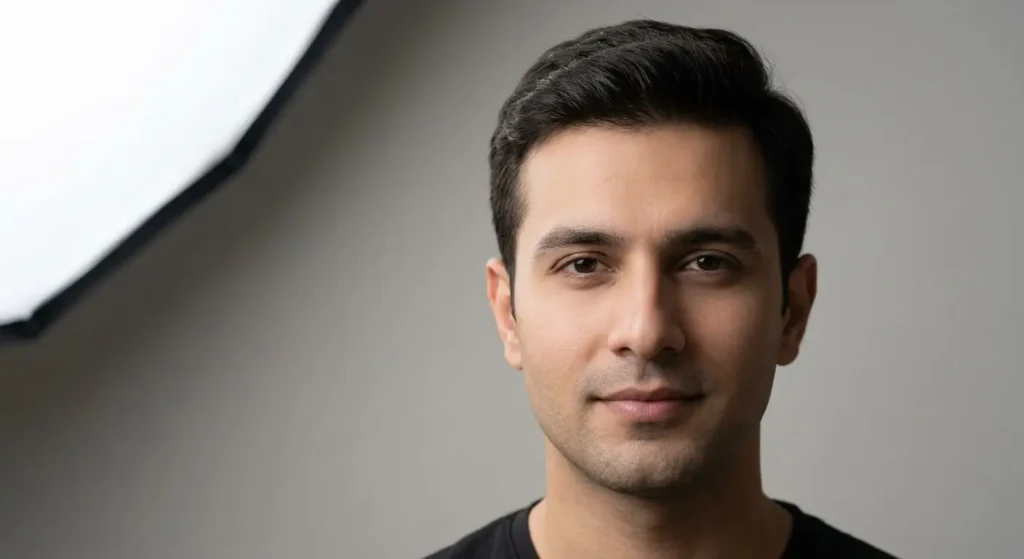
Loop lighting is probably the most commonly used setup in professional portrait photography and for good reason. It’s natural-looking, versatile, and flattering on the vast majority of face shapes. Position your key light slightly above eye level and at about 30 to 45 degrees to the side of your subject. This creates a small, downward-angled loop shadow below the nose. The shadow is visible but subtle; it adds definition without drama.
Loop lighting mimics the way sunlight looks on a slightly overcast day, soft, directional, and pleasing. A fill light or reflector on the opposite side keeps the shadows from becoming too dark. This is an excellent choice for corporate headshots, family portraits, and any client who wants to look natural and approachable. If you’re ever unsure which setup to use, loop lighting is always a safe and effective starting point.
Broad vs Short Lighting
Broad and short lighting are less about a specific light position and more about which side of the face you illuminate. In broad lighting, the key light falls on the side of the face that is turned toward the camera. This illuminates the wider visible area of the face, making it appear fuller and wider. It’s a good choice when the goal is to add dimension to a narrow or angular face.
Short lighting is the opposite: the key light hits the side of the face that is turned away from the camera. Only a smaller portion of the face catches full light. This creates a slimming effect and adds a sense of depth that many photographers and clients prefer. Understanding the difference between these two approaches allows you to adapt almost any lighting setup to suit the specific shape and features of your subject’s face. It’s a simple concept but one that makes a significant difference in the final result.
What equipment do you need for professional portrait lighting?
You don’t need to spend a fortune to achieve great results. Most professional setups use a relatively small collection of tools. Here’s what actually matters when it comes to studio lighting for portraits.
Three-Point Lighting System
The three-point lighting system is the industry standard for a reason it gives you full control over how your subject looks on camera while maintaining a balanced, professional finish. It consists of three lights. The key light is your main light source, positioned to one side of your subject. The fill light goes on the opposite side at a lower intensity to soften the shadows created by the key. The hair light also called a rim or backlight sits behind and above the subject to separate them from the background and add a sense of dimension.
Together, these three lights give you a portrait that looks polished without appearing flat or overly artificial. You can adjust the ratio between key and fill to make the image feel more dramatic or more even depending on the style you’re after. This is the setup most commonly used in commercial portrait photography, corporate headshots, and professional studio environments. Once you understand how each light works, you’ll be able to modify the setup quickly to suit any brief.
Softboxes vs Umbrellas
Both softboxes and umbrellas are light modifiers; they take a harsh flash and turn it into something softer and more flattering. But they behave differently. Softboxes produce a controlled, directional light with defined edges. Because the light stays more contained, you have greater control over where it falls and where it doesn’t. They work brilliantly for headshots and any scenario where you want clean, precise lighting.
Umbrellas, both shoot-through and reflective, spread light more broadly. Shoot-through umbrellas produce a large, soft light source that wraps around the subject. Reflective umbrellas bounce a broader light back at the subject. Both are faster to set up than softboxes and are a popular choice for photographers on location or in smaller spaces. Most photographers end up owning both and switching between them depending on the shoot. Neither is objectively better; they’re different tools for different creative choices.
Reflectors and Scrims
Reflectors and scrims are among the most affordable and underrated tools in portrait lighting. A reflector does exactly what the name suggests it bounces existing light back toward the subject to fill in shadows. A 5-in-1 reflector that includes white, silver, gold, and black surfaces gives you a huge amount of flexibility. White is neutral and soft, silver adds brightness and contrast, gold adds a warm tone that works well for skin, and black absorbs light to deepen shadows.
Scrims are semi-transparent diffusion panels placed between a light source and the subject. They soften harsh light without dramatically reducing its intensity. In outdoor settings, a scrim can make direct sunlight behave more like a large softbox. For beginners, a reflector is often the first and best investment. It costs very little, requires no power, and can make an enormous difference in how a portrait looks.
What is the best portrait lighting setup for beginners?
If you’re just starting out, the honest answer is: keep it simple. A single light with a reflector is all you need to start making great images with the right portrait photography lighting. Start with loop lighting. Place your key light at eye level, move it about 30 to 45 degrees to the side, and tilt it slightly downward. Then hold a white reflector on the opposite side to bounce some light back and reduce the shadow. That’s it. You now have a setup that professional photographers use every single day.
The portrait photography setup doesn’t have to be expensive or complicated. A decent speedlight or entry-level monolight, a softbox or umbrella, and a reflector is genuinely enough to produce professional results. What matters more than gear is understanding how to read light. Practice moving your light source around and watching how the shadows on your subject’s face change. Once you train your eye to see light this way, everything else becomes much easier.
Experiment with natural window light first if you don’t have studio equipment yet. A large window on a cloudy day behaves very much like a softbox. Learning to work with it will build your eye faster than almost anything else.
What are the most common portrait lighting mistakes?
Even experienced photographers fall into these traps. Here are the most common portrait photography lighting mistakes worth knowing about before they cost you.
- Placing the key light too low — Light from below the face creates unflattering, unnatural shadows that are almost never what you want.
- Using only one light with no fill — Deep, uncontrolled shadows can make a portrait look like a horror film still. A reflector on the shadow side is usually all you need.
- Ignoring the background — A blown-out or too-dark background draws attention away from the subject. Use a separate background light or adjust your exposure carefully.
- Setting light intensity too high — Overexposing the face washes out skin texture and detail. Power down your lights and check your histogram.
- Not checking catch lights — The small reflection of your light in the subject’s eyes gives portraits life. Check that they’re visible and well-positioned before you start shooting.
- Forgetting to adjust for skin tone — The same light setup will look different on different skin tones. What works for one subject may not work for another without modification.
- Moving too quickly between setups — Taking your time to dial in one setup properly is always better than rushing through several mediocre ones.
How lighting changes for different skin tones
Lighting for skin tone is a topic that doesn’t get discussed enough, but it matters more than most beginners realise. Lighter skin tones tend to reflect more light, which means you need to be careful not to overexpose. A softer, more diffused key light works well, and a slight reduction in power prevents the skin from appearing washed out. Reflectors with a white surface are usually the safest choice for fill.
Darker skin tones absorb more light and therefore require a stronger or closer key light to achieve proper exposure without losing detail in the shadows. Reflectors with a silver or gold surface can help bounce back enough light without requiring significant changes to your main exposure settings. The broader principle here is that the best lighting for portrait photography is always responsive to the individual in front of your lens. No two people look the same under identical light. Build the habit of reviewing your first few frames carefully and adjusting before you move into the main shoot. Your subjects will notice the difference and so will your clients.
Studio Lighting Setups Comparison
| Setup | Light Source | Difficulty | Best For | Mood / Look |
| Rembrandt | 1 key + reflector | Intermediate | Dramatic portraits | Moody, classical |
| Butterfly | 1 key above nose | Beginner | Beauty & fashion | Glamorous, polished |
| Split | 1 key at 90° | Beginner | Bold / editorial | Strong, edgy |
| Loop | 1 key + fill | Beginner | Natural everyday | Soft, approachable |
| Broad | Key on wide side | Beginner | Slim-face effect off | Open, bright |
| Short | Key on narrow side | Intermediate | Narrow-face effect | Slim, cinematic |
| 3-Point | Key + fill + hair | Intermediate | Studio all-rounders | Balanced, pro |
When should you use a professional photo studio in Lahore?
If you’re based in Pakistan and serious about portrait photography, there comes a point where shooting at home or on location simply isn’t enough. A professional photography studio Lahore gives you something that no amount of portable gear can fully replicate: complete control. You need a professional photo studio when working with paying clients who expect consistent, high-quality results. A studio becomes essential when your photos require a controlled lighting setup, professional backgrounds, and specialized equipment that is difficult to transport. It is also the best choice when your work must meet commercial, editorial, or brand photography standards, where precision and consistency are critical.
Studios like Delenzo Studio in Lahore are designed specifically for this kind of work. They come equipped with professional-grade lighting rigs, a range of modifiers, and the space to set up any of the configurations covered in this guide without compromise. If you’re working on brand photography, fashion shoots, corporate headshots, or any creative project that demands precise portrait photography lighting and a polished finish, booking studio time is almost always worth the investment.
How professional studios improve portrait lighting results
There’s a clear difference between a portrait taken in a well-equipped studio and one shot in a makeshift setup. And most of that difference comes down to the quality and consistency of the lighting environment. Professional studios give you high-powered, colour-accurate lights that behave predictably. They give you a full range of modifiers from large octaboxes to beauty dishes to strip lights so you can build any professional portrait photography setup you can imagine. And they give you the space and infrastructure to do it properly.
At Delenzo Studio, a premier portrait studio in Lahore, every detail is set up to support serious photographic work. From the lighting equipment to the shooting space to the backdrop options, the environment is designed to make your portraits look their absolute best. If you’ve been working hard on your lighting technique and you’re ready to take the results to the next level, working in a professional studio is the most direct path to getting there. The equipment, the space, and the controlled environment do a lot of the heavy lifting leaving you free to focus entirely on the creative work.
Frequently Asked Questions
The best lighting for indoor portrait photography is a softbox or umbrella placed at a 45-degree angle to the subject. It mimics soft, directional natural light. Add a reflector on the opposite side to fill harsh shadows. This simple setup delivers clean, flattering results every time — indoors or in-studio.
Strobe lights fire a powerful flash burst only when you shoot, so they stay cool and accurate. Continuous lights stay on permanently, making it easier to see how shadows fall in real time. Strobes are preferred for studio portrait photography; continuous lights suit video or beginners learning to read light.
Yes a ring light for portrait photography works well for beauty shots, content creation, and close-up headshots. It creates even, shadow-free illumination and a distinctive circular catch light in the eyes. However, it lacks the depth and dimension of a traditional portrait lighting setup, so it is not ideal for dramatic or editorial work.
You can shoot a great professional portrait with just one light and a reflector. For a more polished result, a three-point lighting system key light, fill light, and hair light is the industry standard. It gives you full control over shadows, depth, and subject separation, without requiring complex or expensive gear.
The best studio lighting setup for beginners is loop lighting one key light placed slightly above eye level at a 30–45 degree angle, paired with a white reflector on the shadow side. It is forgiving, flattering on most faces, and easy to repeat consistently. Master this before moving to more complex portrait lighting techniques.